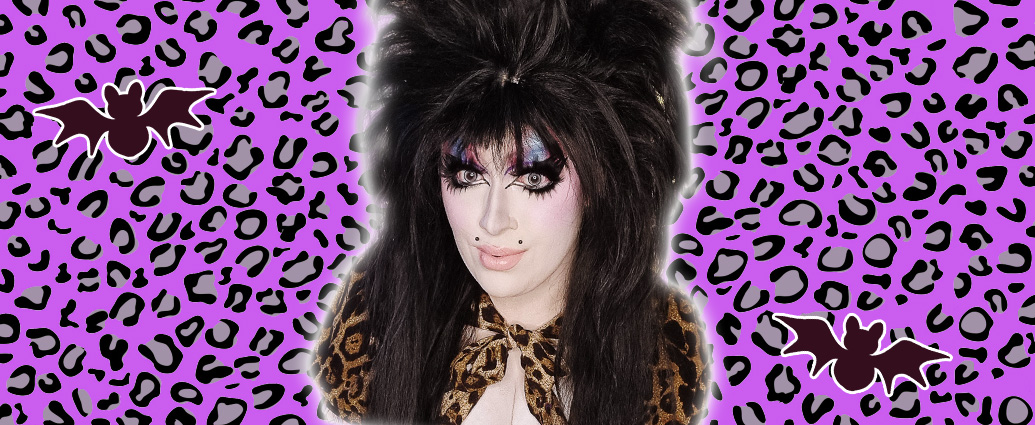
For some of us Galloween is about putting on the sexiest outfit (FUN), and others the most dramatic, creative makeup (Also fun)! Kitt is the Queen of over-the-top alternative looks and here she is yet again serving an amazing tutorial. Read on to see how you can achieve this look!!!

🦋 Halloween GALVIRA Makeup Tutorial

Looking for ideas for your Galloween party, whether you're going out with friends or having a spooky night at home with some horror movies and all the snacks?
This Halloween Papillon got together its' in-house beauty gals for some amazing Galloween tutorials, and here's our second one featuring Kitt! Kitt tells us "I wanted to do a Classic Elvira inspired look for Halloween but do my own personal Gyaru spin on it!"

Scroll down to know how to achieve this makeup tutorial!
Don't forget to take a look at last years Galloween Lookbook for more inspo!
🦋 GALVIRA Tutorial Step by Step!
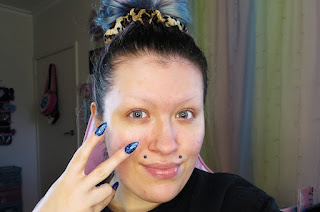 |
| Step 1 Start with clean, well exfoliated and moisturised skin. Face paint will stick to any dry patches and may cause it to look patchy. |
 |
| Step 2 Apply colour corrector where you need it (green on blemishes or orange or peach to correct under eyes and any dark spots or pigmentation) otherwise white face paint will look ashy and grey on those spots, so you will want to correct it before you apply it. Then apply your foundation over top as normal. |
 |
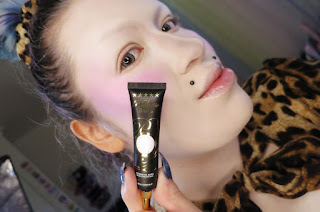
| Step 3 Do not set your foundation with powder. If you don't set it, it will mix with the white face paint to give a pale look without being a harsh white. Mehron White Paradise AQ face paint is water activated, so you have to add water to it to make it work. Apply the white face paint with a round foundation brush first, then blend it with a sponge. *Pro Tip! With water based paints, I prefer using these because they are more versatile. You have control over the opacity you want. If you want a really bright solid white, add less water. If you just want the skin slightly paler, add more water so the paint is thinner. For this look I added 3 drops of water in my pan. Then set face with translucent powder, avoid eyes or you eyeshadow won't stick. |
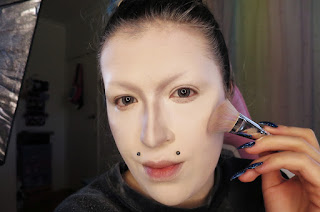 |
| Step 4 Apply a very cool toned/grey Contour shade depending on your skin tone, to add definition to your Cheeks, and Contour the sides of the nose. I use Lunatick Contour palette #1, Palette #2 suits deeper skin tones. I use the same shade for my nose Contour, to connect to my eyebrows and start the fronts of them. *Pro Tip! When I Contour my face and nose, I start with this light grey (light cool #4) shade first over top of the white. And then slowly build up layers of the darker grey (medium cool #7) until it is as defined as you like. |
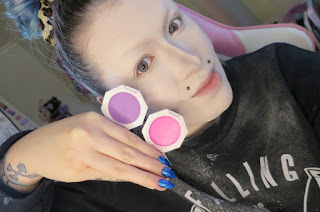 |
| Step 5 In tapping motions, with my finger I apply 2 shades of Fenty Cream Blush. I start with this darker purple shade "Drama Class" Once that is blended in, over top I add shade Bikini Martini (which is like a bubble gum pink shade.) |
 |
| Step 6 I carve out my eye shape with P Louise white eye base. I use a flat rounded "cat's tongue shaped brush." Do not set the eyes with powder. You want to leave it wet so your eye-shadows have something to stick to. |
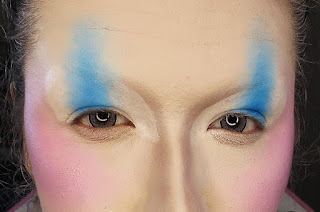 |
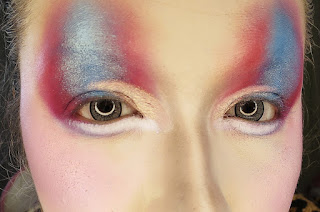
| Step 7 I use a matte blue eye-shadow "Battitude" from Lunatick Cosmetic Labs Limited Edition Elvira Palette. I place the blue in the center of the lid with a flat packing brush. Then take a clean fluffy eye-shadow brush just to blend the outside edges. |
 |
| Step 8 On each side of the blue I use this pink Coral shade "Blossom" from Unicorn Cosmetics Angel palette. Then on each edge closest to the blue. I mix more of a purple pink shade "Baby" the closer it gets to the blue, since when you mix Pink/Red with blue you get a purple colour. And then the outside edges are a warmer pink but closer to the blue it fades into more of a purple-ish colour. |
 |
| Step 9 Use the same shades of blue (Battitude) and (Baby) under the eye. First blending the blue underneath your eye, then just adding the darker purple/pink shade "Baby" on the outside corner. |
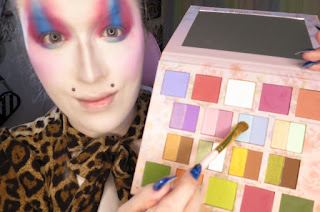 |
| Step 10 Use the pale blue shimmer shade "Cupid" from the Angel palette into the center of the matte blue shade we used, to create a blended halo eye look. |
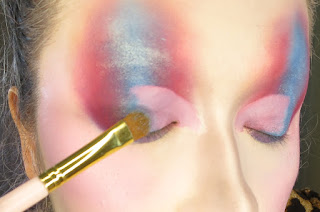 |
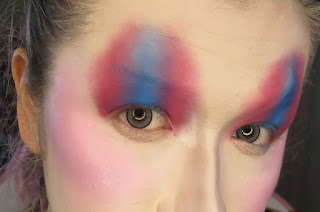
| Step 11 Take NYX Jumbo Milk pencil to cut your crease half way. And use the shimmer white shade "Angel" from the Angel palette to set it. |
 |
| Step 12 Take the NYX Milk pencil, underneath your eye to blend into the shadows, and emphasize your Namida Bukuro (eye bag.) Set with a white shadow Shade "Bone" from the Elvira Palette. |
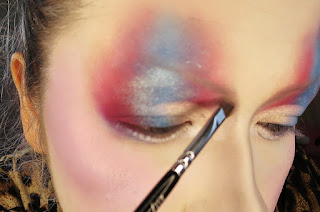 |
| Step 13 Using the same shade "Medium Cool" that we used to contour our nose, on and angled brush use it to draw your brows. Create thin brows with a high arch. |
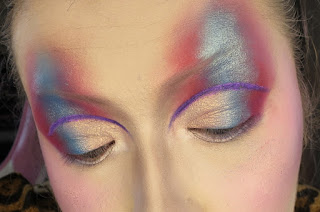 |
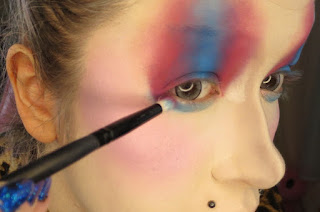
| Step 14 The longer I stare at a photo of Elvira's makeup, I swear I notice something different every time. Like this random purple cut crease line she has. So I use a lavender shade "Smarty Pants" which is a water activated eyeliner from Suva Beauty. And then once that dries I set it with a dark purple eye-shadow (Night Shade from Manic Panic.) Just because I didn't have dark purple eyeliner, but if you have one, you can just use that. |
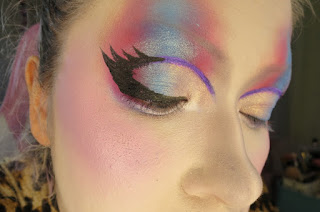 |
| Step 15 Elvira has really funky drawn on upper lashes. So I use my fave black colour brush tip liquid eyeliner, KVD Tattoo Liner to map out the shape of my lashes. I start by making little curvy triangle shapes. Then fill everything in with black. |
 |
| Step 16 If you have hooded eyes like I do, fill in the whole outside half of your lid with black eyeliner, then blend black eye-shadow overtook the inside half where it blends into your eye-shadow like a nice gradient. Add more of your eye-shadow colour if you need to. |
 |
| Step 17 Elvira has white triangle liner for her inner corner, so I tried to imitate that shape but still make it Gal. I used the Same liquid liner to do this (KVD Tattoo Liner) Then I take a pencil liner just in the center of my bottom water line (I try to match it up with where my circle lens stops and ends. Today I am Wearing EOS New Adult Grey lenses in my eyes. |
 |
| Step 18 Connect the outside half of your lower lash line, to the eyeliner on top of your lid. Leave the outside third of your waterline Nude, don't use back here. And with black shadow (I Used "Unpleasant Dreams from the Elvira Palette) extend your eye downwards to create a cute droopy puppy eye shape. |
 |
| Step 19 Add a glitter liquid eyeliner to highlight underneath the black liner. I used a baby pink shade from Urban Decay Heavy Metal glitter Liners. |
 |
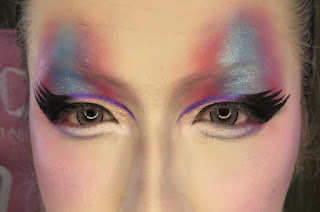
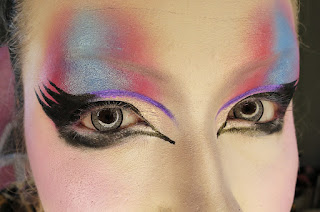
| Step 20 Lip Gloss from Trixie Cosmetics "DUH!" |
 |
| Step 21 Add Mascara and Lashes I used Top Lashes from One Size Style I've Arrived. And Bottom lashes on Amazon from Shidi Shangpin style Glamorous #1. |

🦋 Reader Participation & Goodies!

Don't forget to spice up your phone with these exclusive phone backgrounds designed just for you!
We hope you enjoyed this post! Will you be trying out this look for yourself? Tag your photos with #papillongals to be featured in our blog! Happy Galloween!


Join the conversation!